

Making a pot roast usually means hours of slow cooking, but there’s a faster way to get tender, flavorful results without waiting all day. While slow cookers have been the go-to for a long, slow simmer, many are turning to an appliance that cuts the cooking time dramatically.
A pressure cooker can make a pot roast in about 90 minutes, delivering the same, if not better, tenderness and flavor compared to the slow cooker’s all-day method. This sealed, high-heat environment breaks down tough cuts of meat quickly, so you don’t have to plan your whole day around dinner.
Whether it’s chuck roast or brisket, this method keeps things simple and efficient. For anyone who loves pot roast but hates the wait, switching from a slow cooker to a pressure cooker is a smart upgrade that saves time without sacrificing taste.
Why Skip the Slow Cooker for Pot Roast?
Pot roast is a classic comfort meal, but traditional slow cooking can demand a whole afternoon or more. There are quicker methods that still deliver juicy, tender results without the long wait or hands-on monitoring.
Downsides of Slow Cooking
Slow cookers excel at hands-off cooking, but they often require 6 to 9 hours to get that fall-apart tender pot roast texture. This lengthy cooking time isn’t always practical on busy days or weeknights. Slow cooking also means the kitchen is tied up for hours, limiting flexibility.
Another drawback is flavor development. Though slow cooking allows for deep, rich tastes, it can sometimes mute the meat’s natural juices because of constant low heat. Additionally, slow cookers typically don’t brown the meat during cooking, which means missing out on caramelized flavors unless you sear the roast beforehand.
What Makes Pressure Cooking Faster
Pressure cookers cut cooking time drastically by cooking under high steam pressure. This sealed environment raises the boiling point of water, cooking foods like pot roast in about 60 to 90 minutes compared to hours in a slow cooker.
The steam pressure breaks down connective tissues faster, producing a tender, juicy pot roast without the long wait. Plus, pressure cookers often have sauté and sear functions built-in, so the pot roast can get that caramelized crust in the same vessel, enhancing flavor before pressure cooking even starts.
This mix of searing and rapid pressure cooking makes them a versatile appliance for restaurants and home cooks who want a quick, classic pot roast dinner.
How Flavor Is Enhanced
Pressure cooking preserves and intensifies the pot roast’s natural juices because the sealed environment traps steam and aromas. This means flavors don’t escape, unlike slow cooking where steam can evaporate over several hours.
Searing the meat right in the pressure cooker’s pot adds a rich, roasted flavor through the Maillard reaction—something slow cooking alone usually misses. This quick browning step boosts the overall taste and creates layers of flavor in the finished dish.
In short, pressure cooking accelerates tenderness while locking in the classic rich flavor you’d expect from a long, slow braise—just in a fraction of the time.
The Appliance: Meet Your Pressure Cooker
A pressure cooker speeds up cooking by using steam and high pressure to make meat tender in a fraction of the usual time. It’s a game-changer for anyone who loves pot roast but doesn’t have hours to wait. Modern electric models add convenience with digital controls and preset cooking programs.
How Pressure Cookers Work
Pressure cookers trap steam inside a sealed pot, which raises the pressure and temperature above boiling point. This superhot steam cooks food faster and breaks down tough meat fibers quickly. The sealed environment keeps moisture locked in, so the roast stays juicy and flavorful.
After cooking, pressure release is key. Most prefer natural pressure release, which lets the steam drop slowly to avoid toughening the meat. Quick release lets out steam fast but can sometimes dry out or overcook a delicate roast.
Instant Pot and Ninja Foodi: Top Choices
The Instant Pot and Ninja Foodi are popular electric pressure cookers with extra features that make pot roast easy. Both come with customizable pressure settings and timers for precision. The Ninja Foodi also includes an air fryer lid for crisping outside textures after cooking.
They both have safety mechanisms that prevent pressure from releasing accidentally. The Instant Pot appeals for its straightforward interface and wide range of recipe programs. Ninja Foodi offers versatility with pressure cooking, slow cooking, and even air frying—all in one gadget.
Key Features for Pot Roast Lovers
When looking for a pressure cooker for pot roast, certain features stand out:
- Adjustable pressure levels to get the tenderness just right
- Sauté function for browning meat before pressure cooking
- Large capacity, ideally 6 quarts or more for big cuts
- Easy-to-use pressure release valves with natural release options
- Timer and delayed start so the roast can be ready exactly when needed
These features help achieve the perfect balance of juicy, tender meat and rich, concentrated flavors without spending hours in the kitchen.
Fast and Flavorful: Making Pot Roast in a Pressure Cooker
Cooking pot roast in a pressure cooker cuts the cooking time dramatically while locking in rich flavors. Using the right cut of meat, seasoning well, and properly searing the roast are essential steps. Following a clear method ensures tender, fall-apart beef with perfectly cooked vegetables and a flavorful gravy.
Best Cut of Meat to Use
The best choice for pressure cooker pot roast is beef chuck roast. This cut has the right amount of fat and connective tissue, which breaks down during cooking to make the meat tender and juicy. Chuck roast is also affordable and widely available, making it a practical pick.
Avoid leaner cuts like sirloin or round, as they can dry out under pressure cooking. A well-marbled chuck roast of about 3 to 4 pounds works well for most recipes. Its flavor and texture improve after being cooked under pressure for around 45 to 60 minutes.
Essential Pot Roast Ingredients
Key ingredients give pot roast its classic, comforting taste. Start with olive oil for searing to develop a rich crust on the beef. Aromatics like onion and garlic create a flavorful base. Carrots, potatoes, and additional onions are typical vegetables that cook alongside the meat.
Liquid is critical for pressure cooking. A combination of beef broth, red wine, and a splash of Worcestershire sauce adds depth. Fresh herbs like rosemary and thyme infuse aroma. Season simply with salt and black pepper to enhance the natural flavors.
Searing for Extra Flavor
Searing the chuck roast before pressure cooking is key to maximizing flavor. Heat olive oil in the pressure cooker on the sauté setting or a stovetop pan until shimmering. Brown the roast on all sides until a golden crust forms—this locks in juices and adds complexity.
After removing the meat, sauté the onions and garlic in the same pot to pick up browned bits left behind. This step builds a rich foundation for the cooking liquid and ultimately the gravy. Skipping searing results in a less flavorful dish.
Step-by-Step Pressure Cooker Pot Roast
To begin, season the chuck roast generously with salt and pepper. Heat olive oil in the pressure cooker and sear the meat on all sides. Remove the roast and sauté onions and garlic until softened.
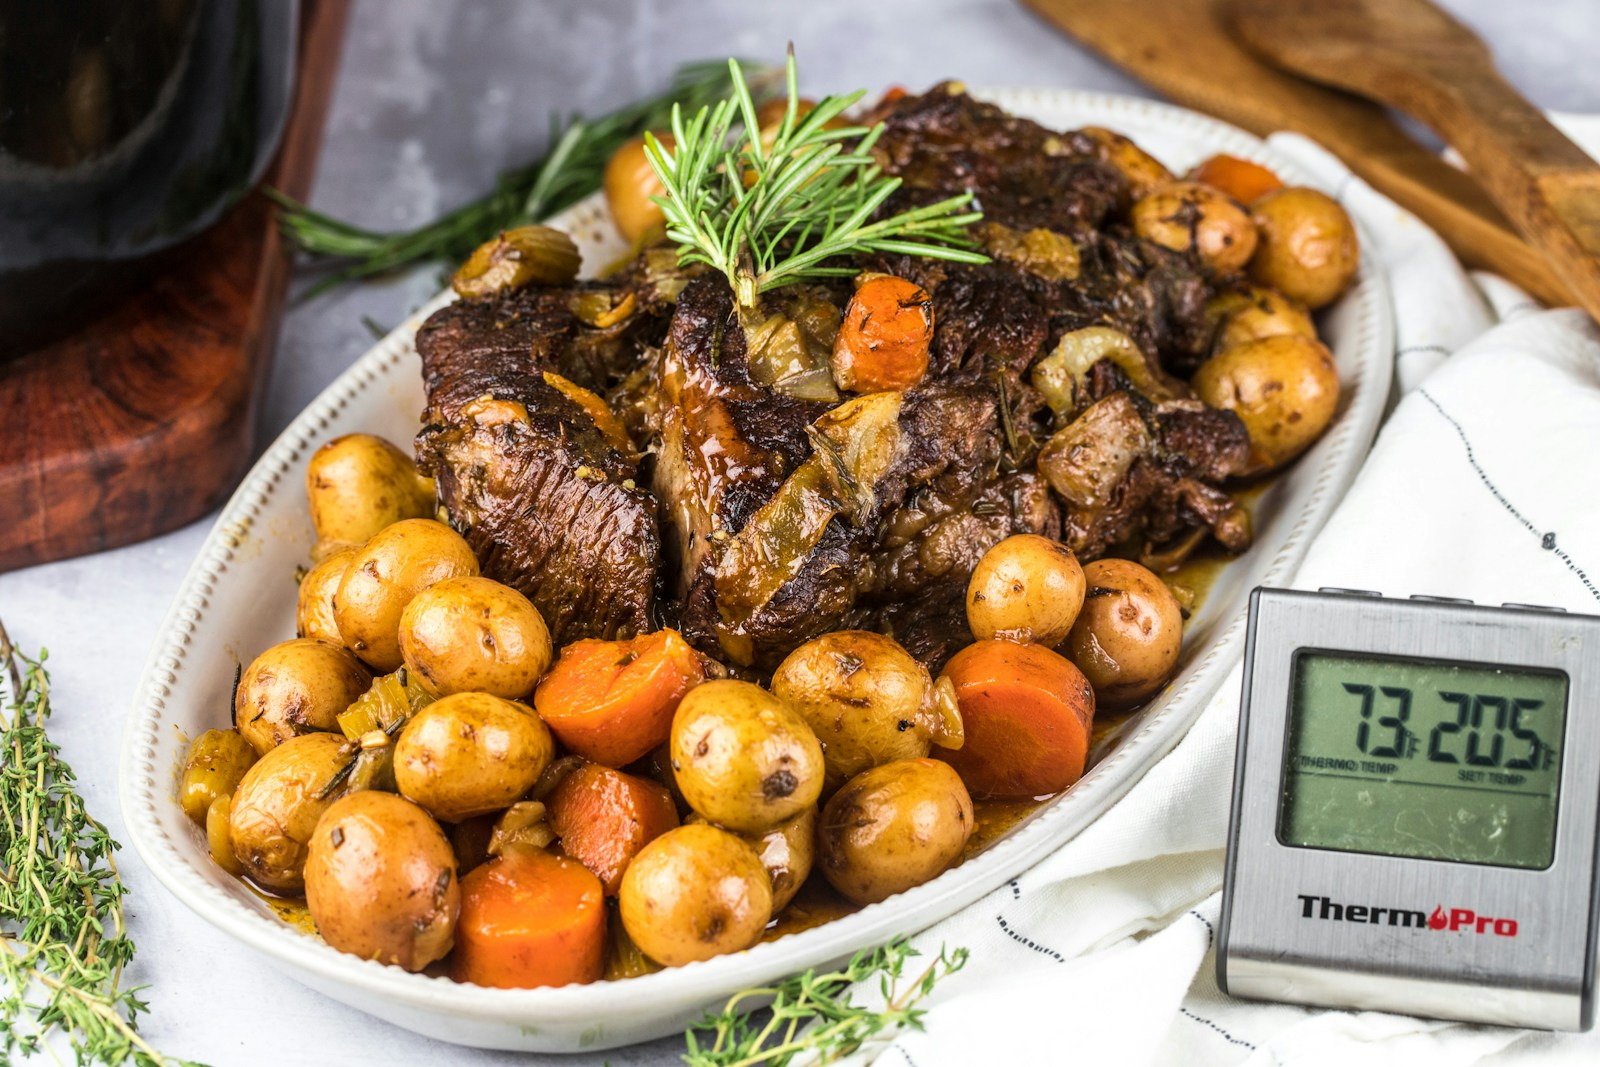
Add beef broth, red wine, Worcestershire sauce, rosemary, and thyme to the pot. Return the roast to the cooker, nestle carrots and potatoes around it, then close and seal. Cook on high pressure for about 60 minutes.
Use a natural pressure release for 10 minutes, then quick release the rest. Remove the meat and veggies. For gravy, strain the cooking liquid and thicken it with cornstarch mixed with cold water. Serve the pot roast with vegetables and mashed potatoes for a hearty meal.
Creative Variations and Serving Suggestions
Pot roast can take on new life by mixing in different flavors and adjusting how it’s served. From an Asian twist to perfecting the gravy texture and pairing with the right sides, there are simple ways to keep the dish fresh and satisfying.
Asian-Inspired Pot Roast
Adding an Asian flair to pot roast transforms it into a flavor-packed meal. Using ingredients like gochujang, soy sauce, garlic, and fresh ginger creates a bold, spicy base that complements the rich beef. Slow cooking or pressure cooking helps the meat absorb these flavors fully, leaving it tender and well-seasoned.
Serve the roast over steamed jasmine or short-grain rice, and don’t forget to add kimchi or pickled vegetables for crunch and acidity. Garnishing with cilantro, sliced green onions, or toasted sesame seeds adds a fresh, aromatic touch. This variation takes a classic dish and introduces layers of umami and spice without overwhelming the original comforting texture.
How to Thicken and Serve the Gravy
Thickening gravy to the right consistency elevates pot roast. After cooking, the pan drippings can be strained and skimmed of excess fat. Cornstarch mixed with cold water makes an easy slurry to add gradually to the simmering juices, thickening it without lumps.
Some prefer a richer texture by adding a bit of butter or cream at the end. The gravy should be smooth and cling to the beef slices and vegetables nicely. Pour it over mashed potatoes or roasted root vegetables to soak up all the flavor. This approach keeps the dish moist and adds to that classic, hearty feel everyone expects.
Best Sides for Pot Roast
Choosing complementary sides enhances the pot roast experience. Creamy mashed potatoes are a go-to, offering a mellow counterpoint to the savory beef and gravy. Roasted or steamed vegetables like carrots, green beans, or Brussels sprouts bring color and texture to the plate.
For an Asian-inspired take, steamed rice fits perfectly, along with simple vegetable stir-fries tossed in garlic and soy sauce. Light salads or slaws with some acidity can balance the richness of the meat. Overall, sides should contrast in texture and flavor to round out an enjoyable and complete meal.

As a mom of three busy boys, I know how chaotic life can get — but I’ve learned that it’s possible to create a beautiful, cozy home even with kids running around. That’s why I started Cultivated Comfort — to share practical tips, simple systems, and a little encouragement for parents like me who want to make their home feel warm, inviting, and effortlessly stylish. Whether it’s managing toy chaos, streamlining everyday routines, or finding little moments of calm, I’m here to help you simplify your space and create a sense of comfort.
But home is just part of the story. I’m also passionate about seeing the world and creating beautiful meals to share with the people I love. Through Cultivated Comfort, I share my journey of balancing motherhood with building a home that feels rich and peaceful — and finding joy in exploring new places and flavors along the way.